3Ds Max - How to create an Avenger logo
Hello everyone, welcome back to JHong blog!
In this opportunity, we're going to create a Avenger logo.
By the end of the tutorial, our skills for using line and splines tool will be improve.
Also, we need an image to complete this tutorial, image can be download here.
The method we're going to use is a little bit the same when we're making the Apple logo at the last tutorial. If you haven't read it, you can go here.
So let's start!1. Change our model's scale
In this tutorial, we're going to use centimeters as our scale setup. To change, go to Customize > Unit Setup > Metric > Centimeters.
2. Applying the image
As usual, to apply the image, we need something for the image to be put on. So, we're going to make a plane. Setting as the following.
Now it's time for us to apply the image to the plane, first, we need to open our Material Editor, Assign the material to the plane, and in the diffuse section, there's a small box behind it, click it and choose bitmap, then choose our image.
You probably wondering, why the image didn't show up on the plane, don't be panic, still on the material editor, click "Show shaded material". Now we need to change the plane to as big as the picture.
3. Making the body
Our setup is done, it's time to make the body. First we need to make it with line and splines.
We start by making the circle, so we go to Splines > Donut.
Once we done that, we need to get rid of the line which crossing some part of the A, which is on the bottom. So since this was splines, we need to convert it into editable splines. To do it, right click on the circle we just made, then "Convert to editable splines". After that, choose vertex.
Four dots appear, but we need more than that. So, in the vertex section, click on "Refine". By now, we can add more dots, so we need to place another four dots on the bottom edge of the circle. See the picture below for more clearer explanations.
Now we can delete the lines between the four dots we just made, so go ahead to splines mode, then select both of the lines, press delete.
After we delete it, we'll soon realize the dot's doesn't have any edges now, so we need to connect them to their partner.
Back into vertex section, press "Attach", then select one of the dots, and connect with their bottom partner. Do the same with the other side. By the end, it would end up something like this.
The circle is done, next thing we're gonna do is to make the letter "A". Go ahead to Line section and start drawing the A. For a better line, we can hold shift while dragging the line, so it will be more accurate. And if you drag it wrong, don't be panic, we can go to one step backward by pressing "Delete". :)
By the end, our results should be like this.
Its okay for them to have each different color, it means they are different. And we need to merge them as one. How to do that? First of all, you can click on whatever object you like, it could be the circle, the A, or the little arrow, next, on the line section, click on "Attach".
Boom! Now all of them are merged together as one.
We noticed there's one small problem. Yes, the circle are crossing the A. So we need to combine them. But they already merged together. How?
It's okay, we got Boolean.
So click on the object we just merged, go to segment section, now we'll see lots of dots, so click on the circle, then press Boolean, but note, it should be on Unite boolean mode.
I forgot the name XD
But we can see the image below for a clearer explanation.
After you press boolean, click on the "A". Now they're unite together.
4. Shaping the body
We finished with the raw shape, it's time to make them 3D, we're going to use bevel to give a better and smoother edges than extrude.
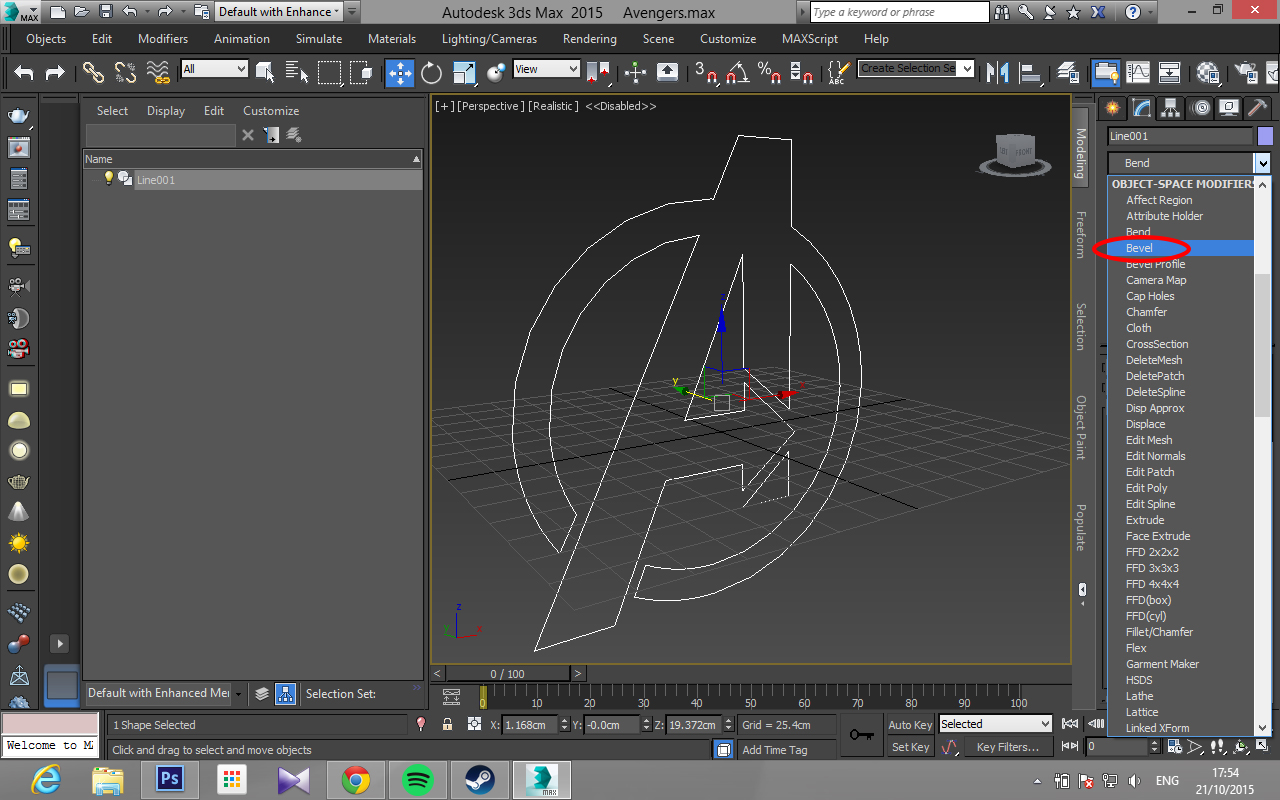
So first, we can delete our plane, then click on our Logo, on the modifier panel, click "Bevel".
Now put the bevel setting as the picture shown.
Don't forget to change the interpolation to 32 for a smoother edges!
To make our logo even more cooler, we put a text to it. In order to do that, first go to Splines > Text.
Then type "THE". The font I was using was Arial Bold with Italic, 28 cm size.
Next thing we're going to do is to pull the letter alittle closer to the edges of our logo, then on modifier panel, click extrude.5. Grouping
Don't forget to group them, so it will be easier when you're going to arrange them later on.
So go to Edit > Group > Group name.
Okay, so that's all for our tutorial, I hope you guys enjoy it, don't forget to suscribe to this blog, share it, and if you have any question or comment, you guys always welcomed to post it!
See you around! :D


